
Home Sellers: Pre Listing Inspection or Skip Repairs? $250–$700
Yes. For most sellers, a pre-listing inspection is a smart, low-cost way to avoid last-minute surprises, price the home accurately, and move toward a sale with fewer stalled negotiations. It won’t guarantee a smooth close, and it does create disclosure obligations once you know about a defect, but it puts you in control of the timeline instead of a buyer’s inspector.
TL;DR:
- A pre-listing inspection costs between $250 and $700 and takes two to three hours, with reports usually delivered within a few days.
- It covers major systems like the roof, foundation, electrical, plumbing, HVAC, and safety features, with optional tests such as radon or mold, depending on the home’s location and age.
- Having this inspection allows sellers to address safety issues and repairs on their schedule, potentially strengthening bargaining power and providing marketing transparency.
- If repairs are extensive or high-cost, sellers can consider direct-buy options or selling as-is instead of traditional listing to save time and money.
- Inspectors should be certified by organizations like InterNACHI or ASHI, and review samples to avoid unreliable reports that lack photos or specific recommendations.
Table of Contents
- What Is a Pre-Listing Inspection, and When Do Sellers Use One?
- What Does a Pre-Listing Inspector Actually Check?
- How Much Does It Cost, and How Long Does It Take?
- Weighing the Benefits Against the Tradeoffs
- How to Prepare Your Home for the Inspector
- What To Do With the Inspection Report
- How to Choose a Qualified Inspector
- When an Inspection Supports Listing, and When It Points Elsewhere
- What AAS Home Buyers Offers When Repairs Don’t Make Sense
- Authoritative Resources and Checklists
- Sources
- FAQ
What Is a Pre-Listing Inspection, and When Do Sellers Use One?
A pre-listing inspection is a full home inspection you order and pay for before putting your house on the market, run the same way a buyer’s inspector would run it. The same person walks the roof, tests the outlets, and checks the water heater. The only difference is who hired them and when it happens.
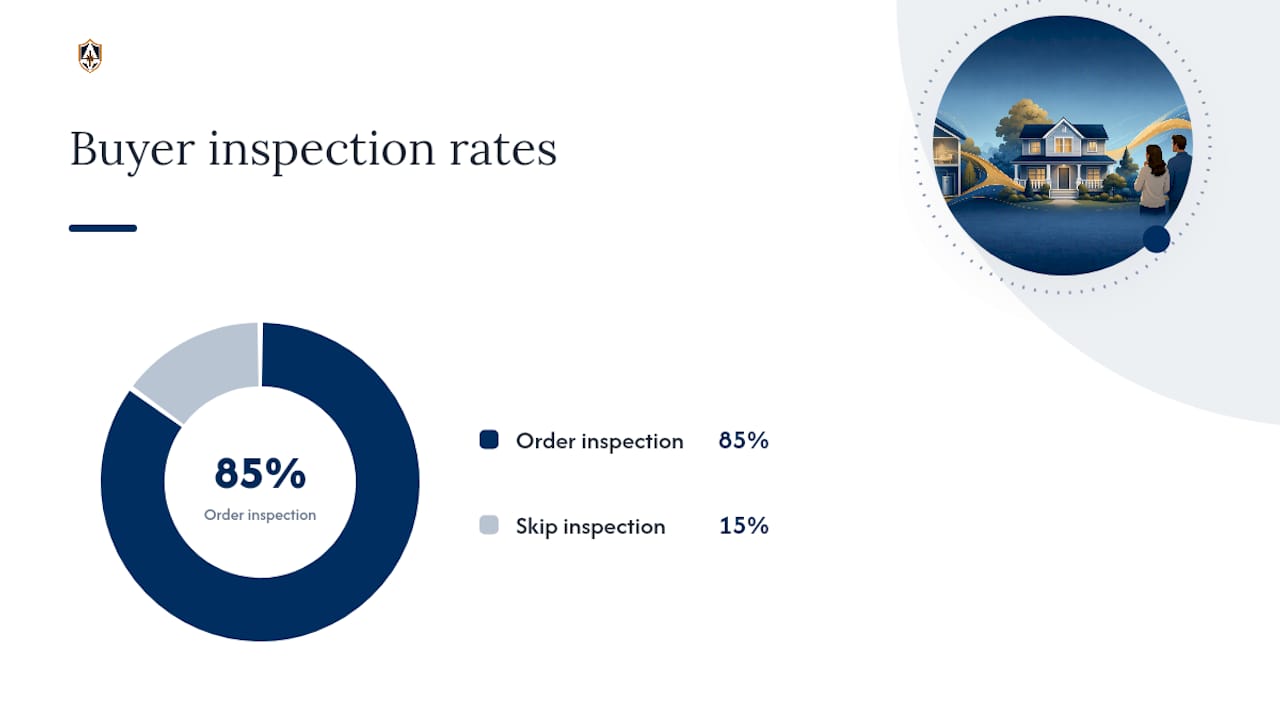
It’s not the same as a pre-listing appraisal, which estimates market value rather than physical condition, and it’s not a substitute for the inspection a buyer will likely order anyway. Roughly 85% of buyers order their own inspection regardless of what you’ve already done, so a seller’s report is a preview, not a replacement.
Sellers typically reach for one in a few common situations:
- Homes older than 20 years with unknown maintenance history
- Properties that sat vacant or were recently inherited
- Sellers who want to price competitively without guessing
- Anyone who wants to avoid a buyer walking away mid-contract over a surprise defect
What Does a Pre-Listing Inspector Actually Check?
A standard pre-listing inspection covers the same systems a buyer’s inspector reviews: roof condition and age, foundation and structural components, plumbing and water pressure, electrical panels and wiring, HVAC function, and interior and exterior surfaces. Safety items like smoke detectors, handrails, and GFCI outlets near water sources get flagged too.
Beyond the standard scope, sellers in certain markets add optional tests:
- Radon testing, especially in regions with known elevated levels
- Sewer scope inspections for older homes with clay or cast iron lines
- Mold assessments after any known water intrusion
- Well-water testing for properties not on a municipal system
- Lead-based paint testing for homes built before 1978
Statistic Callout: The InterNACHI Standards of Practice note that a seller’s inspection report typically includes photos and condition ratings for each system, which gives buyers something concrete to review instead of relying on your word alone.
The final report is the real deliverable. Expect labeled photos, a rating for each major system, and a list of recommended repairs sorted by urgency, not just a wall of text.
How Much Does It Cost, and How Long Does It Take?
Budget roughly $250 to $700 for a standard pre-listing inspection, depending on your home’s size, age, and local market rates. Add-on tests like radon or sewer scope typically run separately, often another $100 to $300 each.
On-site work usually takes two to three hours for an average single-family home, and most inspectors deliver the written report within a couple of days.
Statistic Callout: That short turnaround matters for planning. You can realistically order an inspection two to three weeks before your target listing date and still have time to get repair estimates back.
A few factors push the price higher:
- Square footage above 2,500 feet
- Homes over 30 years old with more aging systems
- Crawl spaces, multiple HVAC zones, or detached structures
- Return visits after repairs to confirm the fix held
Weighing the Benefits Against the Tradeoffs
The upside is straightforward. A pre-listing inspection gives you time to fix problems on your own schedule instead of a buyer’s, which strengthens your position at the negotiating table. Documented condition and repair history also gives your listing a marketing edge, since buyers respond well to transparency backed by paperwork.
There are real tradeoffs, too. Once you know about a defect, most states require you to disclose it, so the inspection can create obligations you didn’t have before. Some findings, like foundation movement or an aging roof, can be expensive to address. And since the majority of buyers order their own inspection anyway, you’re paying twice in some cases.
A quick decision checklist for whether it’s worth the cost:
- Is your home older than 15 to 20 years, or has it had irregular maintenance?
- Do you want to avoid renegotiating price after a buyer’s inspection reveals surprises?
- Is your local market competitive enough that a clean report could help you stand out?
- Can you afford to address at least the safety and lender-required items before listing?
If you answered yes to two or more, the inspection is very likely worth the money.
How to Prepare Your Home for the Inspector
- Clear physical access to the attic, crawl space, electrical panel, and water heater. Inspectors can’t rate what they can’t reach.
- Secure pets somewhere other than the house for the visit; a nervous dog slows everything down.
- Run every system you can beforehand, including HVAC, garbage disposal, and all major appliances, so malfunctions surface before the inspector does.
- Gather your paperwork: permits, repair invoices, warranty documents, and appliance manuals. Organized records speed up the visit and support your disclosures later.
- **Schedule well in advance before listing to allow time for repair estimates and preparations. Plan for 24 to 48 hours for the report itself, leaving room to get repair quotes before your photos go live.
Pro Tip: Keep a folder, digital or physical, with every receipt for work done on the house going back five years. It turns “we replaced the water heater” into a documented fact a buyer’s attorney can’t argue with.
What To Do With the Inspection Report
Once the report lands, prioritize findings the way a lender or inspector would: safety issues and lender-required items first, functional problems second, cosmetic notes last. Open permits or unpermitted work deserve early attention, since unresolved permit issues can stall a closing later.
From there, you generally have four paths for each item:
- Repair it yourself before listing, using licensed contractors and keeping the invoices
- Offer a seller credit at closing instead of doing the work
- Adjust your asking price to reflect the condition upfront
- Disclose it and sell as-is, which works better for cosmetic or minor issues than structural ones
For anything involving structural damage, past water intrusion, or environmental testing results, loop in your agent or a real estate attorney before deciding. Receipts and permits you gathered during prep now double as protection against post-closing disputes.
How to Choose a Qualified Inspector
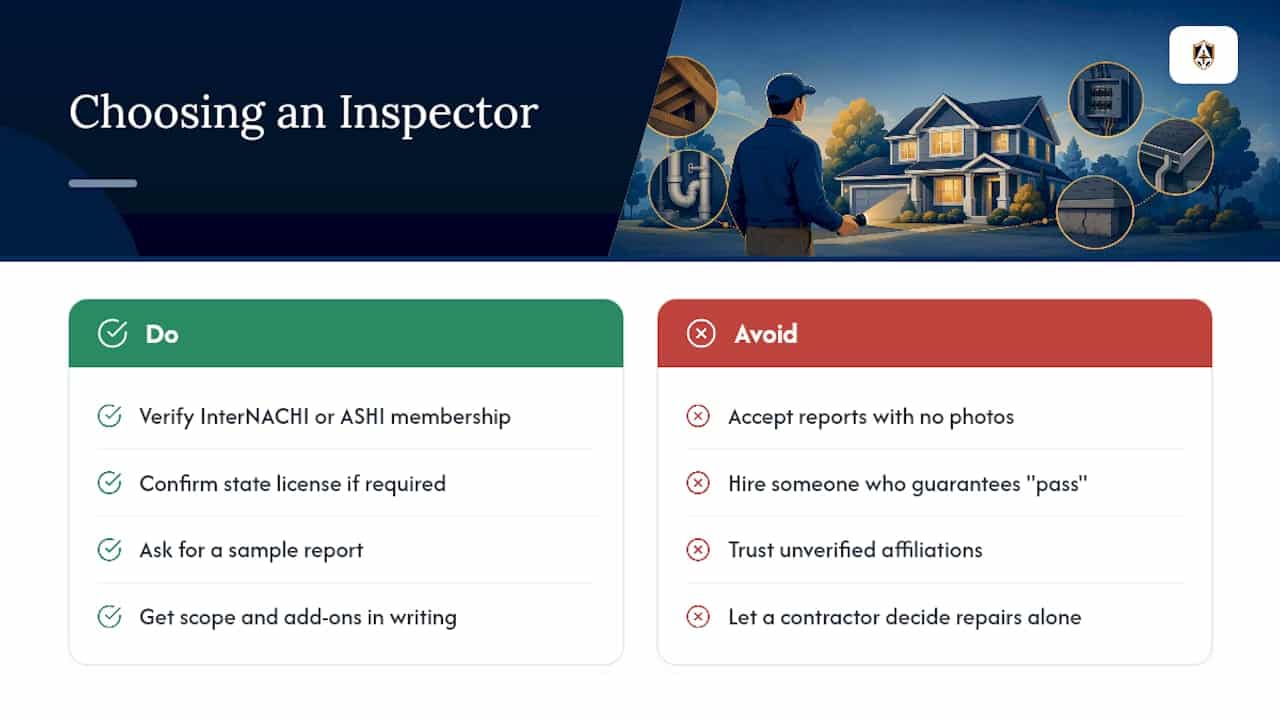
Look for membership in InterNACHI or ASHI, state licensing where your state requires it, and current errors and omissions insurance. These credentials aren’t decorative; they’re what separates a rigorous inspection from a quick walk-through.
Before you book, ask for a sample report. A useful one has clear photos, specific condition ratings, and written repair recommendations, not vague summaries. Get the full scope, including any add-on tests, confirmed in writing before the visit.
Watch for red flags: reports with no photos, inspectors who guarantee your house will “pass,” or anyone with no professional affiliation you can verify. If a home-improvement contractor is helping you triage which repairs actually move sale price, seller repair guidance from a reputable source can help you avoid overspending on the wrong fixes.
Pro Tip: A legitimate inspector will never promise your home will pass a buyer’s future inspection. That claim alone should end the conversation.
When an Inspection Supports Listing, and When It Points Elsewhere
At AAS Home Buyers, we see inspection reports go two directions. When findings are manageable and the local market rewards a polished listing, repairing first and listing traditionally, sometimes through our agent referral network, builds the strongest final price. When repairs are extensive or time matters more than maximizing every dollar, our direct-purchase and Retail Buyer Program options let you skip the repair cycle entirely. We’re glad to walk through your specific report with you.
— AAS
What AAS Home Buyers Offers When Repairs Don’t Make Sense
If your pre-listing inspection turns up a roof replacement, foundation work, or a laundry list of deferred maintenance, listing traditionally isn’t always the fastest or most profitable route. Some home selling services offer options a standard listing doesn’t: a direct cash purchase that skips repairs altogether, partner cash acquisitions, Retail Buyer Programs with managed listing and marketing to maximize price without doing the work yourself, or referrals to vetted local agents if traditional listing still fits your goals.

Every valuation we provide is transparent, with no hidden fees buried in the fine print. Compare your inspection’s estimated repair costs against a no-obligation cash offer before you commit to a repair timeline. Visit our transparent home selling process to see how it works and get a real number for your situation.
Authoritative Resources and Checklists
- InterNACHI’s seller inspection guidance and checklist
- Zillow’s pre-listing inspection cost and process breakdown
- AAS Home Buyers’ complete guide to home selling options
Sources
- Seller’s Pre-Listing Inspection – InterNACHI®
- Should I Get a Pre-Listing Home Inspection? | Zillow
- Pre-Listing Inspection: What to Expect and How to Prepare – LegalClarity
- Before You Sell: 6 Reasons to Get a Pre-Listing Inspection
FAQ
Should You Do a Pre-Listing Inspection?
For most sellers, yes. It surfaces safety and structural issues early, gives you time to repair or price around them, and reduces the odds of a buyer renegotiating late in the process.
What Is the Biggest Red Flag in a Home Inspection?
Structural and safety issues, like foundation cracks, active roof leaks, or outdated electrical panels, are the biggest red flags because they’re expensive, they scare off buyers, and they often trigger mandatory disclosure once discovered.
How Much Is a Pre-Listing Inspection?
Expect to pay $250 to $700 for a standard inspection, with optional add-ons like radon or sewer scope testing costing extra.
What Should You Not Fix Before Selling Your House?
Skip full kitchen or bathroom remodels and other high-cost cosmetic upgrades that rarely return their full price at closing; focus your budget on safety items and anything a lender would flag instead. If the repair list is too extensive to tackle before listing, a faster sale option may fit better than a renovation project.